I’m at the end of my tether (and wasted materials!) trying to fix an issue with curling prints so hoping you guys and gals can help. Some background:
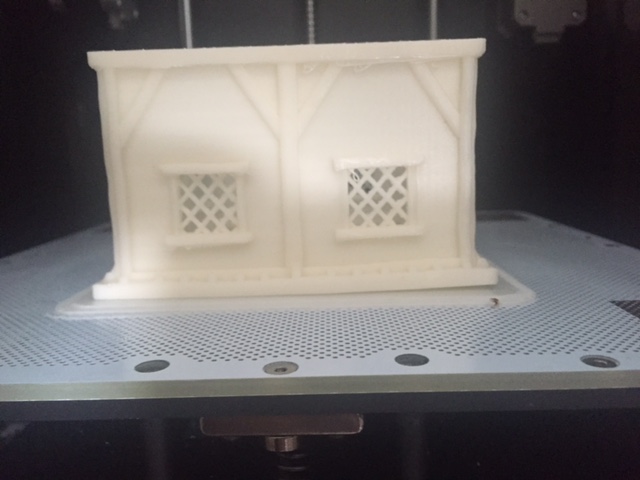
When I first bought my printer, I had no curling. I broke my print bed (sliced through the connector on back with the spatula when removing a print) and bought a replacement. Since I started using that replacement I’m getting curling on the front right edge of my prints (see attached photo). I don’t get this with smaller prints (4cm square ish) but as soon as I go to 8cm prints, this corner starts to lift.
I’ve always printed in Z-ULTRAT, but I’ve switch to Z-ABS, and both have the same issue.
My first thought was a draught. I couldn’t feel or find a draught in the room, and I didn’t have this problem with the old bed, but I added the side and front doors to the printer anyway; it didn’t help. I’ve tried printing on a still, calm, day too to be extra sure which didnt help either.
I’ve tried recalibrating the bed height before every print; didn’t help.
Other than changing the print bed, nothing has changed so I have no idea what this could be. Help!
Did you put a thin layer abs juice on your new perforated board before using it ? It helps a lot. Moreover, an un-leveled build plate can cause that too.
I didnt put anything on my new plate before using it. Should I have? What's ABS juice?
Cheers
Its recommend to use some kind of 3d Print glue or made some ABS Juice. Link has been given above. You can also dim your plate before doing it, using some kind of delicate sandpaper.
The fact that the problem started when you changed the perfboard may be significant. Have you put a ruler edgewise at various angles on the bed to verify its flatness? Have you recalibrated the bed leveling? As Marcin suggested, roughing up the surface a little to take off the gloss may improve adhesion, just be sure you don't sand the nickel plating off of the contact areas (it's very very thin).
I did as you recommended - thanks for that - including sanding and ABS juice, and this has stopped the raft separating from the print bed. However, I still get a similar yet different issue:
The print is now curling and separating from the raft.
This is still only happening with larger prints (this pictured one is 105x77mm) - prints about 60x60 show no curling and it seems to get worse the bigger they are.
The curling is always in the same corner
Any more ideas on what I can do about this now that it doesnt seem to be a bed adhesion issue?
Perhaps remove the perfboard and clean underneath with the scraper then some acetone, then reattach and go through the bed leveling procedure.
I cleaned underneath when I did my deep clean (that stopped the bed separating, but hasnt stopped the print separating from the bed) but out of interest, what does cleaning the underneath do? It seems to a newbie that it wouldn't make much difference.
This is really odd. I never had any ABS print separating from the perf-board and never ever needed ABS slurry. As a matter of fact it is really difficult to get the raft off sometimes.
Is your heat-bed working fine and the perforated board mounted properly? (Mount it like your car-tires.. Always tighten screws on opposite sides)
No left of bits of plastic accidently stuck between perforated board and head-bed?
Thermocoupler not loose so that the filament is melting fine and gets into the holes when laying the raft?
I always clean my perf-board with alcohol while it heats up to get it completely fat-free, but I am just a neat-freak.
I've had ABS prints rip themselves from the raft, it's mostly a matter of print geometry. Sometimes the shrinkage forces are simply greater than the inter-layer adhesion. Large, rectangular box-like structures seem to be the worst.
"Always in the same corner", though, would seem to point to something that might be fixable. If you're using the print cooling fan you could try reducing it or turning it off. If you're not using minimum infill you could try reducing infill.
Second julias suggestion, turning off the fan and reducing the infill can sometimes help a lot (on larger parts, I usually set the fan to low/off)
Kinda suspicious about the problems appearing after switching out the bed and always occurring in the same spot.... if you have something to check the bed temp with, see if the temp is uniform on the bed.
Also, don't know if its related to your problem or not, but noticed from the pic that the bed leveling adjustment screw is expanded a ton. When adjusting the bed, make sure the adjust spring screw is fully compress and adjust with the minimum expansion necessary; the adjust screw standoffs become less stable and can shift left/right/fwd/back the taller the screw is set.
Also, don't know if its related to your problem or not, but noticed from the pic that the bed leveling adjustment screw is expanded a ton. When adjusting the bed, make sure the adjust spring screw is fully compress and adjust with the minimum expansion necessary; the adjust screw standoffs become less stable and can shift left/right/fwd/back the taller the screw is set.
Great spot! I never thought about it, but I guess in all the time I've been adjusting the printer I never thought to tighten the screws first (despite the fact that it does ask you to... though in slightly broken English, which is why it never clicked). I did this last night and printed another test print, and the warping was reduced a lot on that print but it's hard to know whether that's related or not so need to do some more testing (and turn fan off etc. Infill is already minimum)
Also, something i noticed whilst doing this is that the long screws that screw in the little black cylindrical poles that separate heat bed from the plate underneath it were loose. I tightened them, but they protrude quite a bit above the perf board… is this normal?
I cleaned underneath when I did my deep clean (that stopped the bed separating, but hasnt stopped the print separating from the bed) but out of interest, what does cleaning the underneath do? It seems to a newbie that it wouldn't make much difference.
The reason for cleaning underneath is that some plastic gets pushed through the holes and builds up on the underside. This will create elevated regions. If the center, where the height sensing is performed, is elevated, then the non-elevated parts of the plate will be lower and may have reduced adhesion. Some people do a "pre-flexing" of the perfboard in order to introduce a deliberate bow in an effort to make the center lower than the rest of the plate.
Great spot! I never thought about it, but I guess in all the time I've been adjusting the printer I never thought to tighten the screws first (despite the fact that it does ask you to... though in slightly broken English, which is why it never clicked). I did this last night and printed another test print, and the warping was reduced a lot on that print but it's hard to know whether that's related or not so need to do some more testing (and turn fan off etc. Infill is already minimum)
Also, something i noticed whilst doing this is that the long screws that screw in the little black cylindrical poles that separate heat bed from the plate underneath it were loose. I tightened them, but they protrude quite a bit above the perf board… is this normal?
Just checked my printers, two of the printers had those loose as well, thanks for point out!
Protruding over the plate is normal, some of mine do so a little bit.