Since the forum doesn’t have a “My Modifications” section, I guess this goes here…
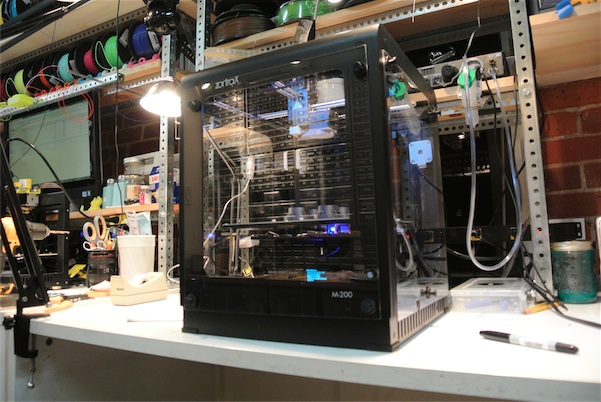
I made magnetically-attached side and front panels from Lexan sheets, and am pleased with the results. Doesn’t take up any extra bench space, provides unrestricted visibility, and the panels are easily removed for access. Details can be found at
First the second: Lexan isn’t acrylic? Polycarbonate perhaps? Just curious.
The newbie one: Why the need to put the printer enclousered?
How this improve the performance?
[/quote]
Thanks, Venosa! Lexan is polycarbonate. Plexiglas is acrylic. Acrylic is easier to cut (score and snap) but PC is much stronger, harder, and less brittle.
I’ve found that using an enclosure with my Afinia results in better overall print quality: smoother finish, more accurate dimensions, easier support removal, less warping, and less delamination (which is usually the result of warping). I used it for a long time without an enclosure and thought that it wasn’t really necessary, but since buying the enclosure I’ve come to appreciate how much difference it makes. All high-end commercial/industrial FDM printers are enclosed, and for good reason, I think.
You are right, Lexan is a brand name for Polycarbonate. For your first question, the enclosure has proven to help with general temperature stability which helps with layer adhesion and to minimize warpage. Of course this will have varying degrees of effectiveness and has a lot of dependent factors, such as ambient room temperature and print geometry.
Nice job Julia, I duct taped some corrugated plastic to my M200 for a while. It left the tape gunk all over. I will have to give it a good alcohol scrubbing. I plan on making a nice one at some point. I might use magnets too. I have been printing without it for a while. I am now trying to make a bracket for a webcam and it is long. I cannot get the raft to stop coming up on one side or the other. I had to make it smaller and rethink the whole design. Now trying to print it smaller. I completely forgot about the enclosure. The other thing is I am using the “bad” white. I want to do all of my accessories in white. Wish me luck.
[quote name=dhatw]Nice job Julia, I duct taped some corrugated plastic to my M200 for a while. It left the tape gunk all over. I will have to give it a good alcohol scrubbing. I plan on making a nice one at some point. I might use magnets too. I have been printing without it for a while. I am now trying to make a bracket for a webcam and it is long. I cannot get the raft to stop coming up on one side or the other. I had to make it smaller and rethink the whole design. Now trying to print it smaller. I completely forgot about the enclosure. The other thing is I am using the “bad” white. I want to do all of my accessories in white. Wish me luck.
Dhatw.
[/quote]
Careful with solvent on the Z - Rafal told me that acetone wouldn’t affect the anodizing, but when I tried to remove some sticker gunk with it, the pad came off blackened and the finish was slightly marred.
Take the i/Phone/iPad holder thingie off and you have a well-made swingarm that can position the cam (which I hang upside-down) any way you want at any time and which pivots completely out of the way when you need access to the printer.
I’d suggest tossing the “bad white”, it’s bad, at least at standard Z extrusion temp. No layer bonding.
Thanks for the tip about the acetone. I actually noticed the blackening of paper towels when cleaning the aluminum plate under the PCB board. I was planning on using 100 percent alcohol but I will tread carefully. As for the camera mount, nice idea, I never thought of something like that. I am actually making something to clip onto the printer. I might get too much shaking but I don’t mind trying. I have had success with small prints with the white. I really don’t want to toss it. If this bracket doesn’t print with the white I might try it with gray and keep the white for small things.
[quote name=Julia Truchsess][quote=dhatw]Nice job Julia, I duct taped some corrugated plastic to my M200 for a while. It left the tape gunk all over. I will have to give it a good alcohol scrubbing. I plan on making a nice one at some point. I might use magnets too. I have been printing without it for a while. I am now trying to make a bracket for a webcam and it is long. I cannot get the raft to stop coming up on one side or the other. I had to make it smaller and rethink the whole design. Now trying to print it smaller. I completely forgot about the enclosure. The other thing is I am using the “bad” white. I want to do all of my accessories in white. Wish me luck.
Dhatw.
[/quote]
Careful with solvent on the Z - Rafal told me that acetone wouldn’t affect the anodizing, but when I tried to remove some sticker gunk with it, the pad came off blackened and the finish was slightly marred.
Take the i/Phone/iPad holder thingie off and you have a well-made swingarm that can position the cam (which I hang upside-down) any way you want at any time and which pivots completely out of the way when you need access to the printer.
I’d suggest tossing the “bad white”, it’s bad, at least at standard Z extrusion temp. No layer bonding.
[/quote]
I assume that most of you in the forum are in a temperate climate (cold, by now), what happens in a warm environment? Let’s say 26-38C in summer, 18-24C in winter. Or perhaps is more a matter of maintain a controlled micro-environment?
I live in California (LA) and have not really experienced any real warping problems. I have found that most warping problems can be resolved by properly leveled build platforms and appropriately choose fills.
I have not sanded, taken apart or done anything else to the Zortrax.
[quote name=Winstonc]I live in California (LA) and have not really experienced any real warping problems. I have found that most warping problems can be resolved by properly leveled build platforms and appropriately choose fills.
I have not sanded, taken apart or done anything else to the Zortrax.
David
[/quote]
It is (obviously) highly dependent on the geometry of the part(s) you’re printing. If you’ve never seen warpage I assume you’ve not tried printing something like this:
because it’s extremely difficult to get parts like this not to warp when printed in ABS on any consumer FDM printer. Or maybe that California air really is magical
Bed level affects adhesion to the build plate, i.e. the ability of whatever’s holding the material to the build plate, to resist the forces of warpage, but assuming your print is well-adhered to the bed, it is thereafter square to the extruder (as it must be by the nature of the print mechanism), and bed level has nothing to do with upper layers of the part warping and/or splitting. This is a function of material properties (how much it shrinks as it cools) and the temperature of the build environment during and after printing. One of the patents that Stratasys is suing Afinia for infringment of covers controlling the build environment’s temperature such that the part is cooled in a slow and controlled manner to minimize shrinkage/warpage.
Here we see a print that is perfectly adhered to the build plate, but the raft and the part itself cannot resist the shrinkage forces:
One fan just keeps the bridge between extruder motor and heating block cool and it’s always running. You need this so that the ABS does not melt too far up in the guide tube. The cooling air exits to the side only and does not have any direct effect on the part. The second fan is directed to the part and will later be used to control the cool down of the ABS. My experience from my old printer (UP) is that this fan is useful if you print very small delicate details…because it prevents them from drooping.
[quote name=Andre]Julia, could you in the end print this large part successfully? If yes, what did the trick?
[/quote]
I determined that warpage is unacceptable in the “flat” orientation - the two halves of the part will never mate well enough.
I have printed it successfully a number of times on my (enclosed) Afinia in a vertical orientation. By printing both halves with the “front panel” at the top I end up with a very flat front panel, acceptably flat top/bottom surfaces, and a gently curved, i.e. warped, rear panel. Since the top and bottom halves end up with the same curvature they mate OK and it’s acceptable for proof-of-concept prototypes.
When I tried to print it vertically on the Zortrax using the white Z-ABS I received, it had horrible splitting issues - the parts were completely unusable. The I started the identical print using pp3dp Up filament, but unfortunately the spool ran out mid-print so I couldn’t do a full comparison, but there was little or no splitting with the Up filament. I was going to write up a complete comparison with photos, but then Martin advised that the Z-ABS I received (yellowish) was the wrong material, so the whole experiment was meaningless. I never received a replacement for the yellowish incorrect Z-ABS.
[quote name=Scentapio]Julia great job, I did the same with cartonboard, enclosing the upper part it’s necessary??? Any idea in how could be done???
[/quote]
Thanks, Scentapio! I started with cardboard before I had time to do the nice clear panels. I checked the temperature and am getting about 37-40C around the build volume:
I’m not sure how much additional benefit a top cover would yield; I think the side panels alone should do a pretty good job of blocking external air currents and maintaining a reasonably constant build temp. To close the top I think the filament would need to be inside the enclosure due to the extruder moving on two axes.