LACKING - some very obvious features.

I love my Zortrax, I think it has a lot of potential. But that being said, the software is lacking.

missing features:

Shell:

- a way to print a solid body model with zero infill.

- must also allow user to control wall-thickness
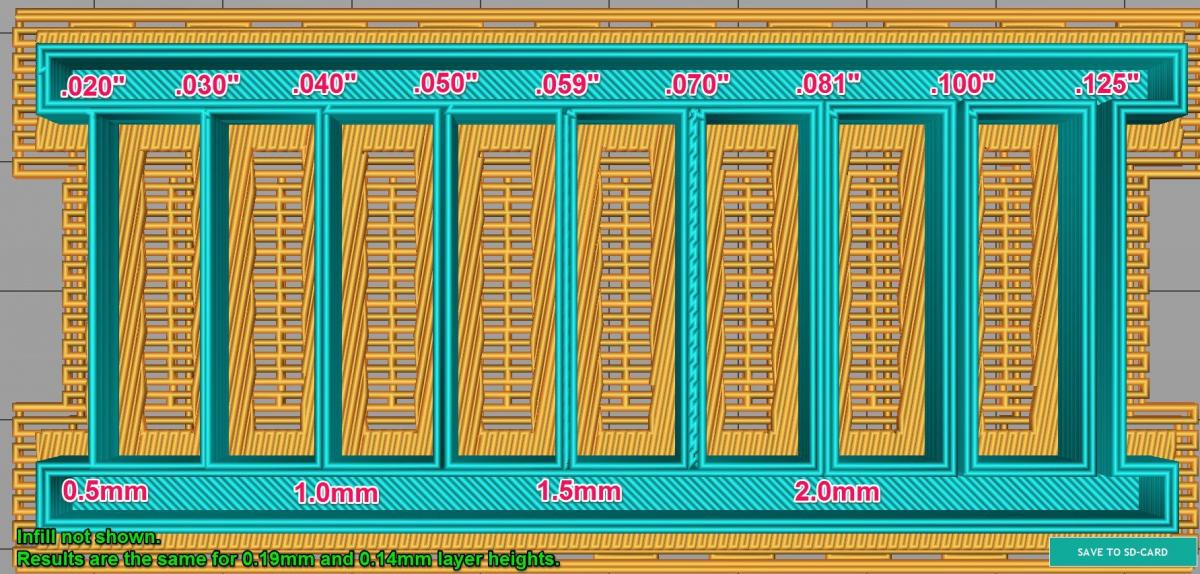
Wall Thickness:

- how thick a shelled or infilled solid body model's wall thickness is.

- needs to be user-adjustable.

basic Support Options:

- a way to turn off model-to-model support.

because often times when I am printing I only want support material coming off the print platform and not coming off the model.

Existing "advanced" options are very limited:

Avoid Holes

- ok, this is clear enough, and I imagine it is a decent attempt at preventing strings from showing up.

Surface Layers:

Top/Bottom

- You guys need to add "Walls" and then all of a sudden you have a useful feature (wall-thickness control).

Offsets:

- is this a joke?

any machine-compensation for accuracy should be done automatically. It shouldn't be very challenging for you guys to run a series of tests: For example, printing various holes and cylinders at various diameters. Measure them with a micrometer and/or dial calipers, then create an algorithm that would automatically "offset" according to feature diameter. I'm so sick of having to modify my part's tolerances just to suite the Zortrax M200.

- If I'm going to be injection-molding a model (or printing it on any other machine) I shouldn't have to modify dimensions to get an accurate print from the Zortrax.

PLEASE: print off a series of tests and create a proper algorithm.

I'm printing 3.7" parts now from the Zortrax that are dimensionally off by as much as .027"!

That's an inaccuracy of .0073" per inch. There is no reason for inaccuracy to increase as the feature size increases... just create the algorithm to compensate. There is also no reason for a tall feature to fluctuate in dimensions as it grows taller... try printing a 7" tall rectilinear object and measure the discrepancy in width as the height increases... log that data and create a compensating algorithm.

Even the existing basic options have some issues:

infill options:

FULL - SOLID - MEDIUM - LIGHT

... perhaps this is a "made in china" translation error, but what is the difference between the word "full" and "solid" when it comes to infill?

(I'll give you a hint... there is no difference)...

and more importantly:

why in the world is "full" not actually "full"?!

I wan't the ability to print a rock-solid part.

I'm not asking for very much,

just some pretty basic features and a machine compensation algorithm that would bring the Zortrax M200 up to the same level as some of the other printers out there.

Good luck, 

and please start rolling-out the improvements.

-Josh!

A copy option for objects, I need to load again the file. What if I need to print 20 or 30 equal parts?

An easier way to relocate the objects maybe a SHIFT or CTRL and mouse combination but not no be defined by coordinates...

<_< Nevermind I justo found the way to do it XD Still exploring the SW.

I have to agree on the dimensional accuracy… I have to tweak my models pretty much every time to get the desired dimensions in the final part. The manual offset feature does not really help since it’s the same trial and error thing. The UP software does it better and also has a calibration routine to account for the non avoidable dimensional tolerances between printers.

We just have to be patient…it will happen eventually.

We’re (unfortunately) still in beta. There has to be a 1.0.0 version one day…

Ctrl C copies a model…

A copy option for objects, I need to load again the file. What if I need to print 20 or 30 equal parts?

An easier way to relocate the objects maybe a SHIFT or CTRL and mouse combination but not no be defined by coordinates...

<_< Nevermind I justo found the way to do it XD Still exploring the SW.

Care to share the answer?

Care to share the answer?

As Andre said ctrl+c copies a part then crtl+v to add the copy.

When you click the move button on the Z-suite, just grab the part and it will move freely, the same happens with rotate, and scale.

Cool - I knew about dragging, and I tried Alt-dragging (which should be implemented) but I didn't try copy-paste, thanks!

I agree with 

<span><a  class="" href="http://forum.zortrax.com/index.php?/user/184-joshpit2003/" title=""><span><span style="font-weight:bold;">joshpit2003</span></span></a></span>

and another vote more for auto-compensation algorithm. I want to make things that will not lay on the shelf, but will do something/make my life easier, so good tolerance is my priority.

I see options for inner and outer offsets, but I don't know how to use it. Has anyone experience/advises with it?

Draw a simple square with a hole in it. Then maybe a round disk with square hole in it. Measure part for proper dimensions. If hole is too small. increase inner contour.. If outside is too small increase outer contour.. I have found my outer to be ok.. Inner I had to increase .13 to get the hole almost dead on.

@slaweks82

Inner offset is for ‘holes’, outer is for ‘outside’ dimension.

For understand how this working and why sometimes it is important - overall compensation algorithm doing job sometimes even perfectly and when model is hot after print sizes can match even up to 0.02mm tolerances but… then model slowly is cooled and shrinking come into play, model become more small and holes also become more small due of cooling force.

This is why outer and inner offset in ZSuite can be only increased, if you printing 30x30mm square with 10mm hole and as result after model cooling you got 29.9x29.9mm and 9.8mm hole then it means due of heat it shrink and outer offset have to be corrected by 0.1mm and inner offset (hole) by 0.2mm - the best is to start with smaller values.

But here is no rule how or if model shrink after print everything is due of geometry, model size etc. this is why sometimes compensation have to be tuned manually.

With bigger object situation is more complicated due of slight warping can be missed 0.x mm even if everything was printed correctly and model have correct size measurements can show deviations due of slightly warping.

Good direction for parts which require tight dimensional tolerances is Z-ULTRAT which do not shrink so much at cooling as Z-ABS overall for any engineering I do not recommend Z-ABS this is why we announced Z-ULTRAT material.

But with Z-ABS even if size is not perfect material have some amount of flexibility and assemblies can fit without problem.

Also shrinking and temperature differences is a reason why full infill is not fully full, we will give ‘full full’ infill in advanced options at next updates but then any mistake in printed part design come into play (too thick walls, too thick part, lack of ribs and no rounded corners etc.) as horrible warping/defects.

@Andre

I think you found the source of problem with idea of additional simple calibration.

Thanks, Kyle! This is the documentation that should have been provided by Zortrax.

Thanks, Kyle! This is the documentation that should have been provided by Zortrax.

:D

Also shrinking and temperature differences is a reason why full infill is not fully full, we will give 'full full' infill in advanced options at next updates but then any mistake in printed part design come into play (too thick walls, too thick part, lack of ribs and rounded corners etc.) as horrible warping/defects.


Will the "new" full infill take care of the gap between thin walls. The reason I ask is because I have some tubes that I am printing at .460 ID and .540 OD but the wall is so thin that it will never print the wall properly. I compensates by making the inside hole much smaller. But if it would just take the gap out of the middle of the walls it would be dead on.

Will the "new" full infill take care of the gap between thin walls. The reason I ask is because I have some tubes that I am printing at .460 ID and .540 OD but the wall is so thin that it will never print the wall properly. I compensates by making the inside hole much smaller. But if it would just take the gap out of the middle of the walls it would be dead on.

Hey Rich I just printed a test at .460 ID and .540 OD.. I think you are safe.. The inner and outer walls are fused together.. I cut it in half and still can't them to separate..

@Andre

I think you found the source of problem with idea of additional simple calibration.

Not sure what you mean exactly... do you mean that you will add a simple calibration like the UP later?

Hey Rich I just printed a test at .460 ID and .540 OD.. I think you are safe.. The inner and outer walls are fused together.. I cut it in half and still can't them to separate..

Thanks Kyle I'll try again.

Thanks Kyle I'll try again.

Can you see two separate tubes when you print it?

@Kyle & Martin

You provided nice, technical explanation, that I think Zortrax is a bit missing, as it's not only plug & print (but is close to :) Also I have not found information that Z-ULTRAT is shrinking less. Thanks again for this.

Do you have any tips about printing thin-tall walls? I want to print some kind of cover (picture on bottom) 170x115x140mm printed from Z-ABS. Nozzle diameter is 0.4mm. Is it better to make walls like 1.2mm (exactly 3x nozzle diammeter) or a bit less like 1.0-1.1mm to make wall more dense?

cover.PNG

The nozel may be .4mm, but the bead of plastic it puts out is more like .5mm and the slicer plans accordingly:

.5mm walls are printed as a single bead.

.5mm < 1mm it prints two beads of plastic smooshed together, which can give mixed results.

1mm walls are printed as two beads.

1mm < 1.5mm prints as two beads of plastic with no fill between them. This is rarely what you're looking for.

1.5mm walls are printed as three beads.

1.5mm < 2mm prints as two plastic bead with filler in between.

2mm prints as 4 beads.

>2mm prints as two walls, each made of two beads, with infill in between.

90

skitch.jpg

I generally try to go 1.5mm or greater.

Also: These notes are based on .14mm and .19mm layer heights. They can change slightly with .29mm and .39mm layer heights. If you view the layers in the slicer output, you can see what it's going to print (except for the infill, which apparently they don't show because it is too demanding on graphics cards).

@Rafal Thanks for clarifying!  I should have indicated that my testing was done with the "Full" infill setting. I chose this because presumably we'd be trying to make the thin walls as thick as possible. Does the layout of the "wall" beads of plastic change with other Infill settings?

Also, I should have indicated that my post was based on first hand testing with my V2 Printer and V0.0.6 Windows of Z-Suite (and not based on offically knowing how the slicer works).

Thanks again!