Hi guys, I have a problem with the attached ...
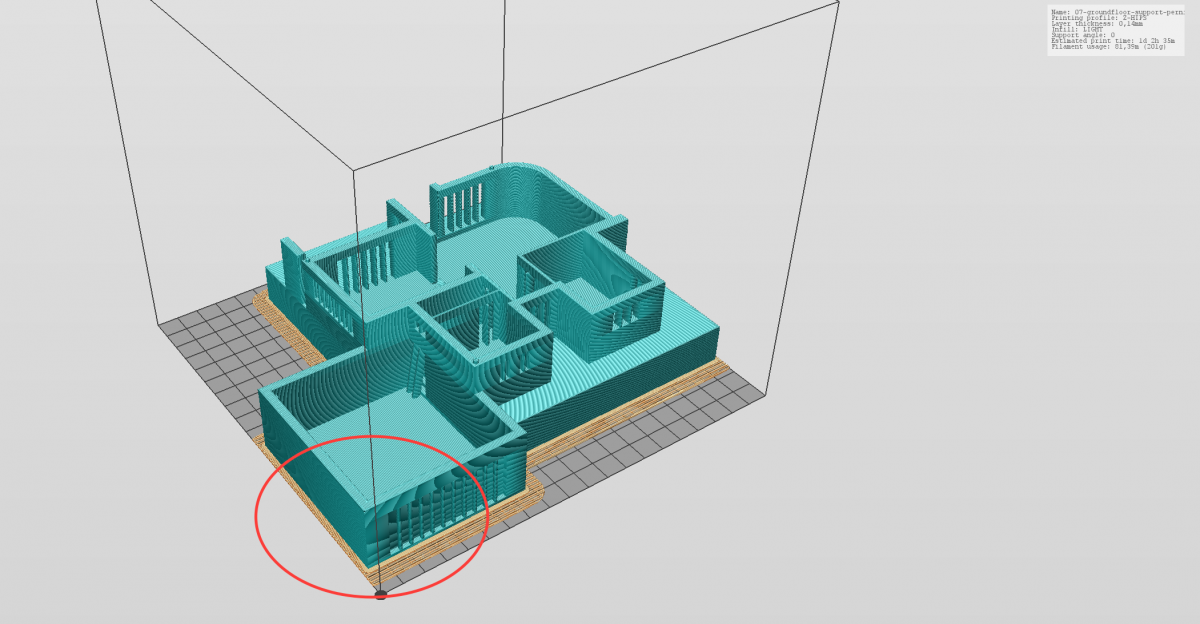
Given the size of the print I using HIPS, but in the area I have highlighted I have the problem of detachment … how can I fix the problem as it is only in that area?
Thanks!
716
Hi guys, I have a problem with the attached ...
Given the size of the print I using HIPS, but in the area I have highlighted I have the problem of detachment … how can I fix the problem as it is only in that area?
Thanks!
716
with hips abs juice will not work so try using a glue stick to help hold it down and if you don’t have side covers on your printer that can be part of the problem, you need to hold the heat to stop the worping. If can’t make your own sides for your printer you can get them on ebay, I hope this helps
I'm having the same warping problem, even with sides. What is a good fan speed to use for large footprint objects in HIPS when the printer is enclosed on the sides? For objects with a lot of thickness is more or less infill better?
Mike
I have found that more infill increases the tendency for warping.
Apart from using side covers it also helps tremendously making sure that the bed is level (+/-0.1 at most) by cleaning thoroughly under the perfboard before each big print and then doing a calibration.
2nd point is more important than using side covers. Ideally you want a 0.00mm difference reported by the firmware.
Sometimes the aluminum bed can warp so it will be a pain in the "tooth" to print such big prints or maybe even completely impossible. In such cases using aluminum foil under the lower spots can cure the problem temporarily until next cleaning cycle is necessary.
Ciao Paolo,
allo stato attuale sto ottenendo ottimi risultati con la colla liquida stick “mitam” www.mitama.biz
però, non l’ho ancora provata su una dimensione di stampa come la tua
Hello Paul,
at present I am getting good results with liquid glue stick “mitam” www.mitama.biz
However, I have not tried it on a print size as your
Paolo,
you’ve already used with z-glass?
at the time, with z-glass I printed always at the top, secure 100 * 100 without the use of glue
(just got another coil z-glass, to use for large prints).
let me know
thanks
I have found that more infill increases the tendency for warping.
Apart from using side covers it also helps tremendously making sure that the bed is level (+/-0.1 at most) by cleaning thoroughly under the perfboard before each big print and then doing a calibration.
2nd point is more important than using side covers. Ideally you want a 0.00mm difference reported by the firmware.
Sometimes the aluminum bed can warp so it will be a pain in the "tooth" to print such big prints or maybe even completely impossible. In such cases using aluminum foil under the lower spots can cure the problem temporarily until next cleaning cycle is necessary.
Thanks - I'll try Light infill on my next attempt at the Toyota engine head, switch to Z-HIPS and make sure it is level. I was at +/-0.1 a couple days when it was last checked. I may just install a new perf board as well.
Do you have any advice on fan speed?
Thanks - I'll try Light infill on my next attempt at the Toyota engine head, switch to Z-HIPS and make sure it is level. I was at +/-0.1 a couple days when it was last checked. I may just install a new perf board as well.
Do you have any advice on fan speed?
I would just use auto.. If not... 20%
I would just use auto.. If not... 20%
Thanks - I'll try auto with Elmer's Extreme gluestick on the bed & Z-HIPS.
Thanks - I'll try Light infill on my next attempt at the Toyota engine head, switch to Z-HIPS and make sure it is level. I was at +/-0.1 a couple days when it was last checked. I may just install a new perf board as well.
Do you have any advice on fan speed
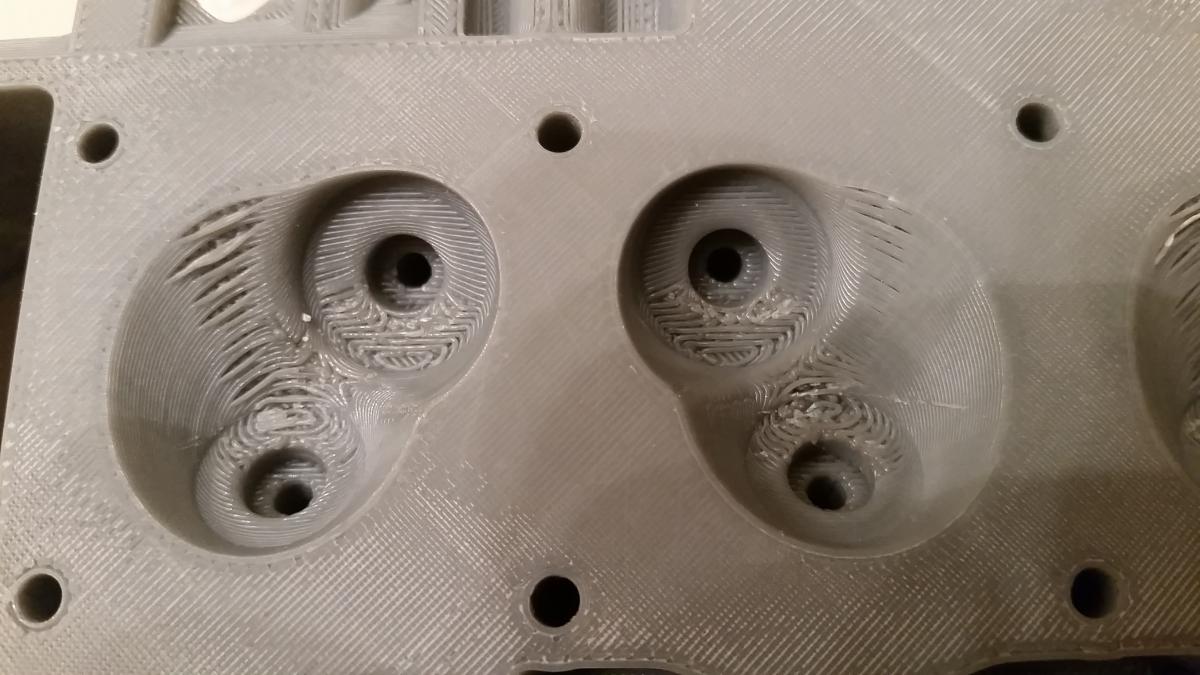
I printed the Toyota head in Z-ABS, .19mm, normal speed, 20% support angle, light infill, auto fan. I did go through the preferred process of scuffing the platform and used "ABS juice". It printed OK. Hung tight to the platform.
It had some problems "pulling the line" on the compound curves of the valve seat area. (Nothing to do with platform or raft separation.) It is basically printing in thin air in this area. Possibly a thinner layer (.14-.09) might do a better job. I don't have official covers but I used cardboard to (mostly) block the side openings of the printer...front is open.
Thanks all! :D
I printed the Toyota head in Z-ABS, .19mm, normal speed, 20% support angle, light infill, auto fan. I did go through the preferred process of scuffing the platform and used "ABS juice". It printed OK. Hung tight to the platform.
It had some problems "pulling the line" on the compound curves of the valve seat area. (Nothing to do with platform or raft separation.) It is basically printing in thin air in this area. Possibly a thinner layer (.14-.09) might do a better job. I don't have official covers but I used cardboard to (mostly) block the side openings of the printer...front is open.
Thanks. It's printing in Z-HIPS now with glue stick on the perf board, but I'd rather use Z-ABS. If this fails I'll tryABS again and scuff the bed up before ABS juice. I always forget the scuffing step.
Did you print the head aligned along the X or Y axis? I've been printing diagonally. Also, do you happen to know how level your bed is?
Mike
The bed is spot-on. I printed as it came in...front to back. After thinking about my issue around the valve seat area I'm wondering if rotating it on its side...say where either the exhaust or intake manifold mounts... would fix that. ericthepoolguy says he going to port the head in a future version...I may have to try then. BTW...let it cool completely before removing it from the platform.
747
748
Hello Paolo,
another problem is of course that the rift / brim in the area is not its normal size because of the model size.
Since my first hips experiments were not as impressive as I thought, I would try u-ultrat with abs juice, enclosed printer and heat controlled interior, I normally turn the printer and the heater on for 60 min to have a constant 45 degree indoor temperature before i start printing big stuff.
best
Andreas
Got the HIPS print done using glue stick on the perfboard and it didn't warp, but the part had cooled down for several hours and was a major PITA to remove from the raft. Lots of residue left over, especially in the nooks and crannies. Printing the block now. Thanks for the help.
… Cleaning the plate > http://support.zortrax.com/hc/en-us/articles/201932181-Cleaning-the-Platform
… abs + acetone …
top … printing without posting …